Search for how to decorate a garden room and you will find a thousand variations on the same advice: pick a theme, add cushions, bring in some plants. It is not wrong. It just starts in the wrong place.
A garden room is a real room, but it is built on a timber frame, it is surrounded by glass and garden, and it sits a walk away from the house. Those three facts shape which finishes last, which ones crack, and how the room feels on a dark evening in February. Get them right and the cushions take care of themselves.
This guide starts with the walls and works outwards: what you are actually starting with, how a timber frame behaves in its first year, the finishes that work with it, and then the design layer that turns a finished building into a room you never want to leave.
The short answer
Decorate it like a room in your home, built on a timber frame. Decide what it is for, plan anything heavy or wired before the walls are closed, choose finishes that tolerate a little seasonal movement, then layer light, texture and the things you love.
Key takeaways
- A garden room is not a cabin to be themed. Ours are handed over plastered and painted, like the house, so the blank canvas is a real one.
- Timber frames move slightly as the timber settles to its surroundings. Most of that movement happens in the first heating season, and it shows at joints and junctions rather than across walls.
- You do not need special materials. You need ordinary, good quality finishes detailed for movement: flexible fillers and sealants at junctions, floating floors with an expansion gap, and the right board behind tiles and micro cement.
- Engineered wood flooring is normally laid floating, acclimatised for at least 48 hours, with a gap of around 10 to 15 mm at the edges.
- Tiles and micro cement are rigid finishes. Over a timber structure they need a stable backing board, reinforcement or a decoupling layer, and flexible adhesives.
- The decisions that are hardest to change, such as backing for large art, mirrors and heavy panels, socket and lighting positions and joinery, belong before the walls are boarded, not after.
- Wallpaper, printed murals and 3D wall coverings are best applied after the first heating season, over a settled wall; panelling, fixed into the frame, is one of the most forgiving finishes of all.
What most of the advice misses
We read through what interior designers, furnishing brands, garden building companies and housebuilders publish on this subject. The good advice is genuinely good. Interior designers writing this year make the point that a garden room only succeeds if it is actually used, and that it needs a distinct character of its own rather than being a smaller copy of the house. Blinds specialists rightly warn that a south facing room can be unworkable without proper control of glare and heat.
But almost all of it treats the room as a finished box. Garden building suppliers tend to offer themes and quick styling ideas. Housebuilders write about conservatories and kitchen extensions. Almost nobody mentions what the walls are made of, or why that matters for the paint, the floor and the tiles you choose. That is the part we know best, so that is where we start.
What you are starting with
Our rooms are not lined in timber boards or panels. Walls and ceilings are plastered and decorated, finished to the same standard as your home, in the colour you choose. You walk into a room that is ready for furniture from day one.
Behind that finish is a timber frame: insulated, sealed and boarded, then skimmed with plaster. It is the same principle as a modern timber framed house, and it is the reason the room can be built in weeks rather than months. It also means the room behaves like a timber building, and that is worth understanding before you start decorating.
Why a timber frame moves, and why it matters
Timber takes up and gives off moisture until it reaches a balance with the air around it. When a new room is first heated, the frame dries a little and shrinks slightly. After that, it moves a small amount with the seasons, a little drier in a heated winter and a little more relaxed in a humid summer.
None of this is structural, and it is not a sign of poor building. Plasterboard and timber frame guidance notes that most shrinkage takes place during the first heating season, and housebuilders tell new homeowners to expect minor cracks as a new building dries out over its first nine months to a year. The same is true of a garden room, usually on a smaller scale.
What matters for decorating is where the movement shows. It is rarely across the middle of a wall. It appears at the joints and junctions: where walls meet the ceiling, at internal corners, around door and window frames, along skirting boards, and where a rigid finish meets a different material. Those are the places to detail with care.
Two habits help in the first winter. Bring the heating up gradually rather than running the room hot from day one, and keep it ventilated, so the frame settles gently. Then deal with any hairline lines once, after the first heating season, rather than chasing them every month.
The finishes that work with a timber frame
The good news is that none of this calls for unusual materials. Paint, wallpaper, engineered wood, tiles and micro cement all work well in a garden room. What changes is the detail: how each one is fixed, backed and finished at the edges.
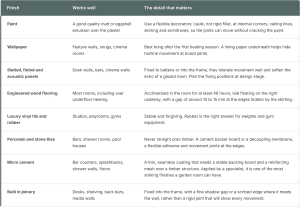
The common thread is simple. A flexible finish can be fixed almost anywhere. A rigid finish, such as tile, stone or micro cement, needs a rigid backing between it and the timber, and a little room to move at its edges.
Plan it before the walls are closed
The most expensive decorating mistakes in a garden room are the ones made after the walls are boarded. A wall mounted TV, floating shelves, a heavy mirror, a drop down desk or a stone topped bar all need solid timber behind the finish in exactly the right place. Sockets, data points, speaker cables and lighting need routing in the same way. Tell your designer early, and it costs almost nothing. Tell them late, and it means opening up a finished wall.
Walls: coverings, panelling, murals and art
In a glazed room, the solid walls are precious. There are usually only one or two of them, and they do a lot of work: they carry the joinery, the screen, the art and most of the room’s character. They are also where a timber frame matters most, because what you hang or stick to them has to work with the structure behind the plaster.
Wallpaper and wall coverings
Wallpaper is one of the quickest ways to give a garden room its own personality, and it works well on a plastered timber framed wall.
Three things make it last.
- Hang it after the first heating season, once the frame has settled.
- Use a lining paper underneath, which bridges any hairline movement at board joints.
- And choose a paste matched to the paper, with a breathable or washable finish where the room sees moisture, such as near a bar sink or in a gym.
Grasscloth, linen and other natural weaves suit garden rooms particularly well, because they bring texture without competing with the view. Keep them away from wet zones and walls in strong direct sun, where natural fibres can fade.
Wall murals
A mural turns one wall into the focal point of the room. There are two main routes. A printed mural wallpaper, made to the exact size of your wall, is hung like wallpaper and follows the same rules: after the first heating season, over a lining paper. A hand painted mural goes straight onto the finished plaster.
Choose the wall carefully. A mural works best on the solid wall facing the glazing, where it is seen from the garden as well as from inside. Plan sockets, switches and any wall lights before it goes up, so they sit neatly within the design rather than cutting through it.
Specialist 3D wall coverings
Three dimensional wall panels, in gypsum, timber, MDF, leather or fabric, add depth, shadow and drama, and they are increasingly popular behind bars, media walls and beds. They also need the most thought on a timber frame.
- Weight. Gypsum and stone effect panels are heavy. Over a large area, they need solid timber behind the plaster, not just adhesive on board.
- Joints. Panels that are bonded and then filled to look seamless are rigid, and a hairline at a joint is more visible across a sculpted surface. Systems with a deliberate shadow gap, or panels fixed to battens, cope far better with a little movement.
- Timing. Like wallpaper, they are best installed after the first heating season.
- Lighting. 3D surfaces come alive with light grazing across them. A concealed LED strip above or below the wall needs planning before the walls are finished.
Wall panelling
Panelling is one of the most forgiving finishes on a timber frame, because it is fixed mechanically rather than bonded, and its own joints and shadow lines absorb small movements. Shaker style and half height panelling give a garden room a tailored, traditional feel. Fluted and reeded panels add texture to a bar or TV wall. Timber slats on an acoustic felt backing soften the echo of a glazed room and look superb behind a desk for video calls.
Every panelling system needs fixing into the frame, not just into plasterboard, so the positions of the battens or panels belong on the drawings. Paint finishes are best done in an eggshell or durable matt that can take the odd knock.
Hanging art, mirrors and big pictures
This is the question we most want to ask early, because the answer changes the wall. Small and medium pictures can hang from plasterboard fixings designed for hollow walls. Large canvases, framed prints behind glass, big mirrors and anything heavy should be fixed into solid timber, and in a garden room that timber needs to be in the right place before the wall is boarded.
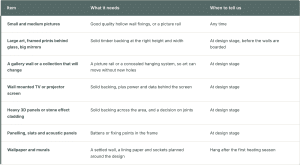
A few principles help art look its best in a garden room. Hang it on the solid wall facing the glazing, where it is seen from both sides of the glass. The centre of a picture usually sits around 145 to 155 cm from the floor, and above a sofa or sideboard, a large single piece of about two thirds of the furniture’s width usually looks better than a cluster of small ones. Keep precious prints, photographs and textiles out of direct sun, use UV filtering glass where you can, and add a picture light or an adjustable spotlight so the work comes alive in the evening.
If you know you have a big piece, a family mirror or a collection to bring, measure it, weigh it if you can, and tell us where you imagine it going. A length of timber added behind the plaster during the build costs almost nothing. Adding it later means opening a finished wall.
The first year, season by season

From blank canvas to home
With the structure understood, the design layer is where the room becomes yours. This is the part interior designers are best at, and the principles that matter most in a garden room are these.
Give it one clear job, and a second if you must
The rooms that get used every day are the ones with a clear purpose: an office, a bar, a studio, a gym, a snug. Many of our clients combine two, such as an office by day and a bar by night, and that works well when the layout is planned for both from the start. Decide the main job first and let everything else follow it.
Light it in layers
Daylight is a garden room’s great advantage, and in midwinter it has faded by four o’clock. Plan three layers of artificial light: a soft ambient glow, task light where you work or read, and accent light on shelves, joinery and art. Put everything on dimmers. After dark, large glazing turns into a black mirror, so a little lighting in the garden outside keeps the view alive.
Take your colours from the garden
The view is the most important picture in the room, so let it lead. Soft neutrals, muted greens and natural timber tones sit comfortably beside planting. Deep, matt colours make a snug or cinema feel cocooning and cut glare. Keep the palette tight: two or three main colours and a neutral are plenty for a single open room.
Use texture to soften the sound
Glass, hard floors and smooth plaster make sound bounce, and a newly finished garden room can feel echoey until something soft goes in. A generous rug, upholstered seating, curtains and timber or felt acoustic panels all help, and they matter even more for video calls, music and film.
Dress the windows for every season
Blinds in a garden room are not an afterthought. They control glare on screens, hold heat in on winter evenings, keep summer sun off fabrics and timber, and give privacy from the house. Choose them as part of the design, not after the first sunny afternoon.
Build it in
Made to measure joinery is what makes a garden room feel designed rather than furnished. A desk that folds away, shelving with lighting built into it, a back bar or a media wall that hides every cable. Because it is planned around the frame, it can also carry the weight properly. It is one of the things we enjoy designing most, along with micro cement bars and counters.
Connect it to the terrace
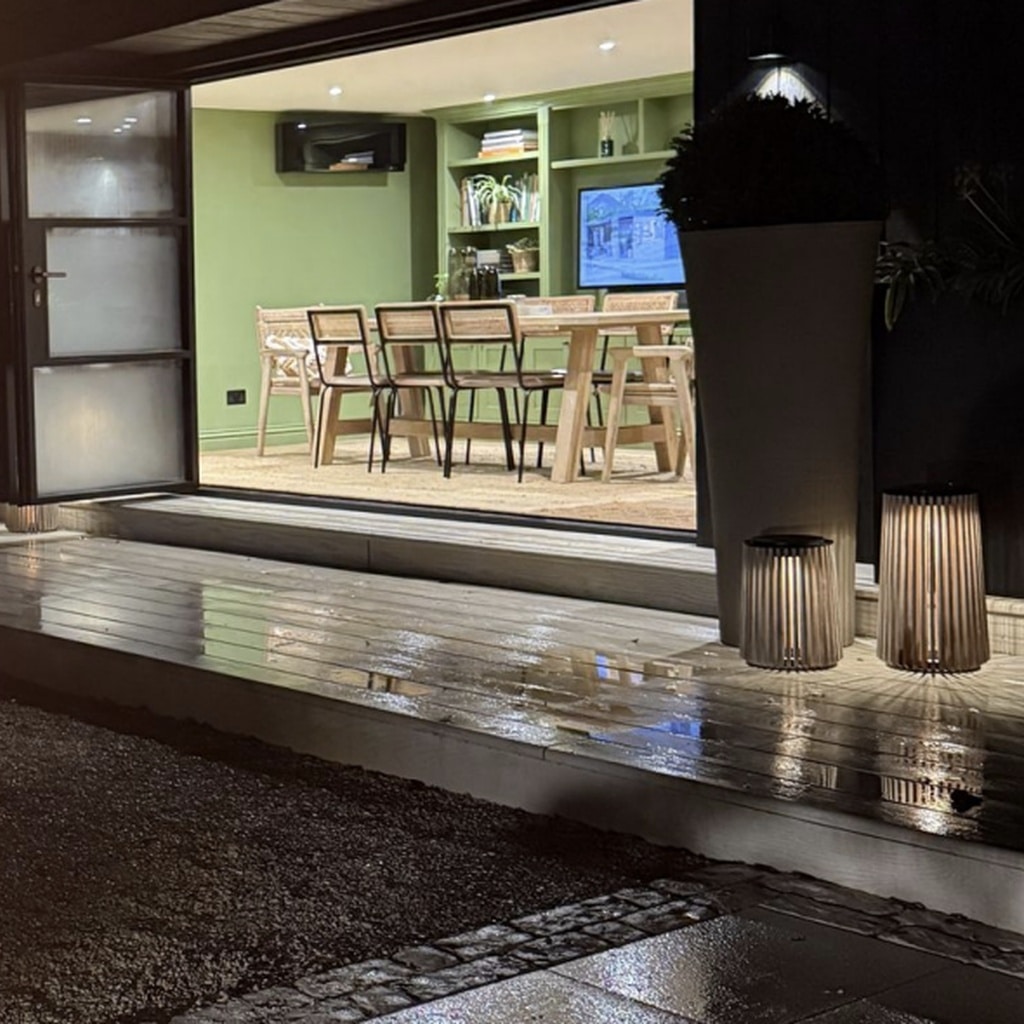
When the doors open, the room and the terrace become one space. Carrying a similar floor tone outside, and choosing indoor and outdoor furniture that share a style, makes the whole thing feel bigger. Our showroom at The Glasshouse Collective in Chobham sits alongside a curated collection of premium outdoor living brands, so you can see furniture, lighting and accessories for both sides of the glass in one visit.
Finish with the personal layer
Books, ceramics, a reading lamp, a blanket basket, a kettle and the art you have planned for. Keep it edited. A few things you love will always look better than many things you like.
How we help our clients
Because our rooms are designed in house by our architect, the interior is part of the conversation from the first drawing. We ask every client for their Pinterest boards, inspiration images and a rough sketch of how they imagine the room, and we plan the frame, the wiring, the lighting and the joinery around it.
Every client also receives our own furnishing and layout guide, Your Garden Room, Beautifully Lived In, once they have committed to their project. It covers the decisions in this article in far more depth, room by room, while there is still time to build them in.
Decorate a garden room from the structure outwards. Plan what is heavy, wired or built in before the walls are closed. Use good, ordinary finishes detailed for a timber frame: flexible at the joints, floating on the floor, properly backed behind anything rigid. Let the room settle through, then add the layers that make it yours.
Do that, and the blank canvas becomes a room that feels as finished as anywhere in the house and a good deal more personal.
Ready to bring your vision to life?
Call us on 020 8088 3572 or use the Quick form to send us a message. We’ll respond promptly with a personalised quote tailored to your project. Your perfect garden room is just a conversation away!
By Into The Garden Room |
November 9, 2026 |